Recovering Deleted/Lost/Missing Data From Novell Servers
If you hear clicking/grinding noises coming from the storage media, then it is a hardware failure – do not continue using the disk. It is preferable to disconnect the server disk immediately. In such cases, even data recovery software may not fully be able to recover lost data – it needs to be turned over to data recovery specialists
If there is intense physical damage to the disk (such as a power surge resulting in smoke or sparks), do not experiment with the media – this needs examination by experts
Do not, under any circumstances, open up the disk since exposing the platters may damage the disk beyond repair. The disk is to be opened up only as a last resort and that too by professionals working in a clean-room
If the data recovery software allows installation on NetWare, do not install the software on the Volume which is affected. While it is possible to install the software on a Volume other than the one which is affected, it is always preferable to connect the affected disk to a working disk and then install the recovery software to the working disk
The ideal method to recover lost data is to connect the affected disk to a healthy disk. Data recovery software is then installed on to the healthy disk after which the software detects and does a scan of the affected disk.
The following section describes the connection of the disks.
2.2 Connecting IDE disks
It is best not to involve the server disk for recovery software installation during a system recovery. It is recommended to install the software on a Windows OS 'host' disk, and then connect the affected server disk to it (to understand why, read section 3 labeled 'Using Data Recovery Software').
This section discusses the connection of IDE (also known as ATA) disks.
Disks with IDE interfaces can be connected as:
- 'Slave' on the Primary channel OR
- Either 'Master' or 'Slave' on a secondary channel
This implies that the disk with lost data can be connected in any way to a working disk, as long as the system does not boot from the affected disk.
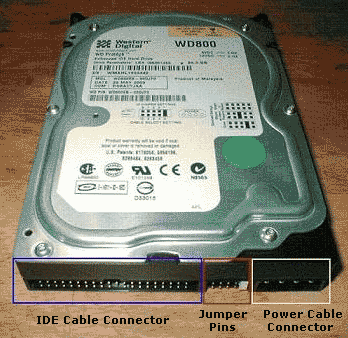
Configuring a disk to be either 'Master' or 'Slave' involves setting the jumper pins at the back of the hard disks.
This is what the back of a disk looks like:
 |
IDE Cable Connector
One end of this connector goes into the back of the disk, and the other into the motherboard.
Jumper Pins
Out of the given sets of jumper pins, one of the sets needs to be 'jumpered' thus giving the disk its configuration. The diagram for the jumper pin configuration should be given in a sticker on the disk. If the failed disk is being connected on the primary channel, it needs to be connected in the 'slave' configuration. Use tweezers to change the switch position. There is a notch that prevents incorrect insertion.
Power Cable Connector
The power cable goes in here. |
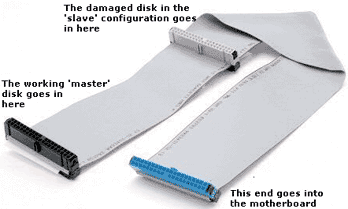
This is what an IDE cable looks like:
 |
Connecting disks to the cable
An IDE cable has one end connected to the motherboard, and the other end usually goes into the disk configured as 'Master'. The working disk which has recovery software installed in it should be the 'Master'. The plug in the middle usually has the disk configured as 'Slave'. If connected in the primary channel, the damaged disk needs to be 'jumpered' to be a 'Slave' and then connected to this middle plug. |
|